Gnome Illustrations: A Designer's Review for Real Embroidery Projects
When I first opened the Gnome Illustrations set, I was immediately struck by the playful yet clean character style. These aren't overly complex or cluttered illustrations—they read as friendly, whimsical, and intentionally simple in a way that translates well to thread. As someone who has tested hundreds of machine embroidery design files for my own craft business and for clients, I've learned that a design can look charming on screen but fall apart in the hoop. I wanted to put these illustrations through a practical evaluation before committing them to a real project, and I'm sharing that process here so you can decide if they fit your embroidery project needs.
First Impressions: Mood, Shape, and Embroidery Readiness
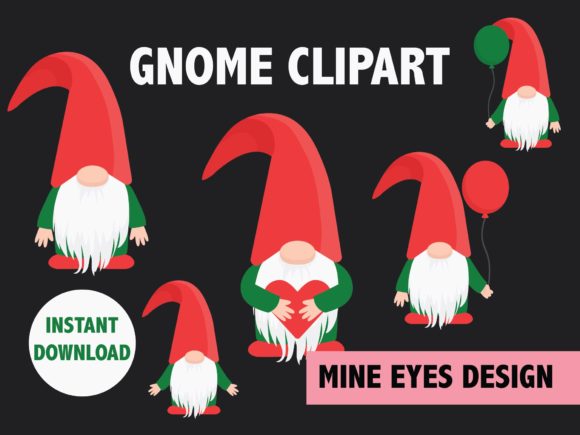
The Gnome Illustrations set offers five distinct character poses, each with a clear silhouette and a gentle, festive feel. The shapes are rounded and generous, which immediately signals strong stitch potential. In machine embroidery, shapes with sharp points or extremely narrow limbs can distort during stitching, but these gnomes have wide bodies, prominent hats, and simple facial features that hold up well under satin stitch and fill stitch treatments. The visual personality leans toward cozy, handmade, and slightly rustic—perfect for holiday embroidery, personalized gifts, and small shop product lines that need approachable charm.
From a designer's perspective, the detail level is moderate. You won't find tiny, intricate elements that vanish under thread. Instead, the graphics rely on bold shapes and a few accent lines, which means the stitch density can be managed without excessive puckering or thread breaks. That alone makes this set a strong candidate for production work, especially if you're an Etsy seller or creative entrepreneur who needs consistency across multiple finished products.
Real-Life Use: Where Gnome Illustrations Shines
I tested the Gnome Illustrations on a custom embroidered tote bag first. The fabric was medium-weight cotton canvas, and I used a medium hoop size to accommodate the largest gnome at about 4 inches tall. The fill stitch areas filled smoothly, and the running stitch details for the beard and hat trim stayed crisp. The design read clearly from a few feet away, which is exactly what you want for a tote bag design that will be carried around as a conversation piece.
On a sweatshirt embroidery project, I placed a gnome on the left chest area. The fabric was a cotton-poly blend with some stretch, and I used a cutaway stabilizer to prevent distortion. The design handled the stretch well because the shapes are mostly solid and the stitch density isn't excessively high. For custom apparel like this, the gnome illustrations create a warm, giftable look that customers often associate with quality handmade products.
I also experimented with an embroidered patch using a smaller gnome. The patch was about 2.5 inches wide, and I used a tight satin stitch border around the edge. The design scaled down reasonably well, though the smallest details—like the eyes and nose—lost some definition. For patches, I'd recommend the two largest gnomes in the set for best clarity.
Other projects where these illustrations performed well include:
- Baby embroidery on onesies and receiving blankets (the soft shapes feel gentle and age-appropriate)
- Pillow cover designs for fall and winter decor
- Tea towels and kitchen towels for holiday gifting
- Apron fronts for boutique kitchen products
- Cap and hat embroidery when placed on the front panel (avoid curved brim areas)
- Nursery decor items like wall hangings or crib quilts
- Holiday gifts and wedding gifts for couples who love whimsical style
For small business merchandise and craft fair products, these gnomes offer a recognizable theme that sells well during the Christmas season. I've seen similar designs move quickly at markets, especially when stitched on sweatshirts and tote bags.
Where to Use Caution: When the Design Needs Extra Care
Not every surface or product is ideal for the Gnome Illustrations. Here are a few situations where I'd recommend testing first or adjusting your approach:
- Small hoop sizes under 4 inches: The smallest gnome in the set can work at 3 inches, but the detail areas become tight. Test on scrap fabric first to confirm that the eyes and nose stitch cleanly at your intended size.
- Textured fabrics like thick fleece, bouclé, or heavy knits: The fill stitch may sink into the texture, reducing clarity. Use a firm stabilizer and consider a tearaway or cutaway backing to keep the design sharp.
- Thin fabric like lightweight cotton or silk: The stitch density could cause show-through. Use a water-soluble stabilizer on top to prevent the thread from pulling the fabric.
- Stretchy fabric like jersey or ribbed knits: The gnome's hat and beard shapes are broad, which helps, but the fabric must be hooped with minimal tension to avoid distortion. Test on a sample piece first.
- Dark fabric: The thread colors in the design are mostly warm and medium-toned. If you stitch on black or very dark navy, consider using a white or light underlay to keep the colors vibrant.
- Layered garments like hoodies with front pockets or zippers: The hoop size required for the larger gnomes may be hard to position cleanly. Plan your placement carefully.
- Curved surfaces like cap fronts or curved bag panels: The design works best on flat or gently curved areas. Avoid placing it near the brim or side seams of a cap.
- Frequent washing items like kitchen towels or baby burp cloths: Use a high-quality thread and a dense satin stitch for the borders to prevent fraying over time.
Visual Appeal, Product Value, and Customer Trust
When a customer picks up a handmade product featuring the Gnome Illustrations, the first thing they notice is the warmth and personality of the character. That emotional connection translates directly to product value and customer trust. In my experience, buyers are more willing to pay a premium for personalized gifts that feel thoughtfully designed rather than mass-produced.
The handmade presentation of these gnomes also supports brand consistency for small shop products. If you're building a cohesive holiday line, these illustrations can be used across multiple items—tote bags, sweatshirts, pillows, and patches—without looking mismatched. That consistency builds recognition and encourages repeat buyers.
From a giftability standpoint, gnome-themed items are popular for Christmas, winter birthdays, and housewarming presents. The design's professionalism is strong enough for boutique settings but still feels approachable for casual gifting. I've found that buyer engagement increases when the product photo shows a clear, well-stitched gnome on a quality garment.
Practical Embroidery Designer Notes Before You Stitch
Before you load the embroidery file and start stitching, here are a few steps I always take with new design assets like this set:
- Test on scrap fabric first. Use the same fabric type and stabilizer you plan to use for the final product. This is non-negotiable, especially for commercial embroidery work where consistency matters.
- Check thread color contrast. The gnome illustrations have a warm, earthy palette. If you're stitching on a lighter background, the hat and beard will pop. On darker backgrounds, you may need to swap or add a contrasting thread for the eyes and nose.
- Review stitch density. If the fill stitch areas feel too dense, reduce the density slightly to avoid puckering. Every machine embroidery design behaves differently on different fabrics.
- Confirm hoop size. The largest gnome requires a 5x7 hoop or larger. The smallest can fit in a 4x4 hoop, but check the file dimensions before loading.
- Inspect small details. The eyes, nose, and any fine lines in the beard should be examined at actual size. If they appear too small, consider enlarging the design slightly.
- Test in black and white mockups. Before stitching, view the design in a single color to see if the shapes hold together without color contrast. This helps identify areas where the running stitch or satin stitch may need adjustment.
- Compare light and dark fabric backgrounds. Stitch a sample on both a light and dark fabric to see how the design reads. You may need to adjust thread colors for one or the other.
- Use proper stabilizer. For most woven and knit fabrics, a medium-weight cutaway stabilizer works well. For stretchy fabrics, use a firm cutaway or a stabilizer with slight adhesive backing.
- Check licensing before selling finished items. The product description states these are for "cut file projects" and "photo collage" and "scrapbook" use, but if you plan to sell finished products or digital embroidery file derivatives, verify the license terms directly with the shop. Most graphics sets intended for cutting files may have different restrictions for machine embroidery use.
- Consider commercial use. If you are an Etsy seller or small business owner producing custom apparel or handmade products for sale, ensure the license covers commercial embroidery use. Some design assets are limited to personal use only.
Final Thoughts on Gnome Illustrations for Your Embroidery Projects
The Gnome Illustrations set is a solid choice for machine embroidery work, especially if you're creating holiday embroidery items, personalized gifts, or small shop merchandise. The shapes are clean, the detail level is manageable, and the overall mood appeals to a broad customer base. With proper testing and attention to fabric and stabilizer, these illustrations can become a reliable part of your design assets for both personal and commercial projects.
Whether you're stitching a tote bag design for a craft fair, a sweatshirt embroidery for an Etsy order, or a baby embroidery gift for a friend, the gnomes deliver a friendly, finished look that customers trust. Just remember to test, adjust, and verify your licensing before you commit to a full production run. That's the difference between a project that works and one that truly sells.